|
|
| Line 3: |
Line 3: |
| | | style="padding:30px 20px; text-align:left; vertical-align:middle;" | | | | style="padding:30px 20px; text-align:left; vertical-align:middle;" | |
| | <h1 style="margin:0; font-size:36px; font-weight: 800; line-height: 1.2;"> | | <h1 style="margin:0; font-size:36px; font-weight: 800; line-height: 1.2;"> |
| − | <span style="color:#333;">Taptica - AppsFlyer</span> <span style="color:#E94E24;">Integration</span> | + | <span style="color:#333;">Taptica - AppsFlyer</span> <span style="color:#E94E24;">Integration Guide</span> |
| | </h1> | | </h1> |
| | |} | | |} |
| | | | |
| − | <div style="max-width: 1200px; margin: 0 left; color: #333; font-size: 15px; text-align: left; direction: ltr; line-height: 1.9; font-family: 'Segoe UI', sans-serif; letter-spacing: 0.2px;"> | + | <div style="max-width: 1200px; margin: 0 left; text-align: left; direction: ltr; font-family: 'Segoe UI', sans-serif;"> |
| | | | |
| − | This guide will walk you through correctly setting up Taptica's partner connection with your app in AppsFlyer in simple steps:[cite: 2]
| + | <!-- PAGE 1 --> |
| − | <br><br>
| + | <div style="text-align: center; margin-bottom: 25px;"> |
| − | | + | [[File:AFtap1.jpg|1050px|center|link=]] |
| − | <!-- DIRECT LINK BOX --> | + | |
| − | <div style="background: #fff; padding: 15px 20px; border: 1px solid #eee; border-left: 4px solid #E94E24; border-radius: 4px; margin-bottom: 30px;"> | + | |
| − | 🔗 '''Direct Marketplace Link:''' [https://hq1.appsflyer.com/discovery/about/taptica_int Click here to go directly to Taptica's integration page on AppsFlyer].
| + | |
| | </div> | | </div> |
| | | | |
| − | <!-- STEP 1 --> | + | <!-- PAGE 2 --> |
| − | <div style="margin-bottom: 25px; background: #fafafa; padding: 20px; border: 1px solid #eee; border-radius: 4px;"> | + | <div style="text-align: center; margin-bottom: 25px;"> |
| − | <span style="font-size: 18px; font-weight: bold; color: #E94E24;">Step 1: Partner Integrations Marketplace</span>
| + | [[File:AFtap2.jpg|1050px|center|link=]] |
| − | <br><br>
| + | |
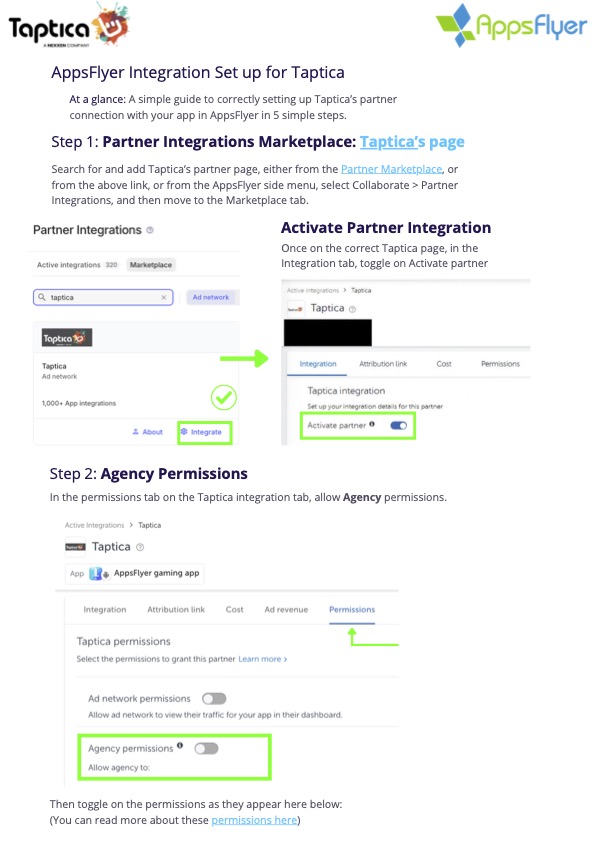
| − | Search for and add Taptica's partner page, either by using the direct link above, or from the AppsFlyer side menu under '''Collaborate''' > '''Partner Integrations''' and moving to the '''Marketplace''' tab.
| + | |
| − | <br><br>
| + | |
| − | Once on Taptica's page, in the '''Integration''' tab, toggle on '''Activate partner'''.
| + | |
| | </div> | | </div> |
| | | | |
| − | <!-- STEP 2 --> | + | <!-- PAGE 3 --> |
| − | <div style="margin-bottom: 25px; background: #fafafa; padding: 20px; border: 1px solid #eee; border-radius: 4px;"> | + | <div style="text-align: center; margin-bottom: 25px;"> |
| − | <span style="font-size: 18px; font-weight: bold; color: #E94E24;">Step 2: Agency Permissions</span>
| + | [[File:AFtap3.jpg|1050px|center|link=]] |
| − | <br><br>
| + | |
| − | Move to the '''Permissions''' tab on the Taptica integration interface and turn on '''Agency permissions'''.
| + | |
| − | <br><br>
| + | |
| − | Then, configure and toggle on the following permissions exactly as shown below:
| + | |
| − | <ul style="margin-top: 10px; padding-left: 20px;">
| + | |
| − | <li style="margin-bottom: 5px;">'''Change the Advanced Privacy setting''' — [[File:toggle-on.png|16px]] '''ON'''</li>
| + | |
| − | <li style="margin-bottom: 5px;">'''Access retention and cohort reports''' — [[File:toggle-on.png|16px]] '''ON'''</li>
| + | |
| − | <li style="margin-bottom: 5px;">'''Access aggregate organic data''' — [[File:toggle-on.png|16px]] '''ON'''</li>
| + | |
| − | <li style="margin-bottom: 5px;">'''View validation rules''' — [[File:toggle-on.png|16px]] '''ON'''</li>
| + | |
| − | <li style="margin-bottom: 5px;">'''Add validation rules''' — [[File:toggle-off.png|16px]] '''OFF'''</li>
| + | |
| − | <li style="margin-bottom: 5px;">'''Access raw data reports''' — [[File:toggle-on.png|16px]] '''ON'''</li>
| + | |
| − | <li style="margin-bottom: 5px;">'''Access Protect360 dashboard & raw data''' — [[File:toggle-on.png|16px]] '''ON'''</li>
| + | |
| − | </ul>
| + | |
| | </div> | | </div> |
| | | | |
| − | <!-- STEP 3 --> | + | <!-- PAGE 4 --> |
| − | <div style="margin-bottom: 25px; background: #fafafa; padding: 20px; border: 1px solid #eee; border-radius: 4px;"> | + | <div style="text-align: center; margin-bottom: 25px;"> |
| − | <span style="font-size: 18px; font-weight: bold; color: #E94E24;">Step 3: Configure In-App Event Postbacks</span>
| + | [[File:AFtap4.jpg|1050px|center|link=]] |
| − | <br><br>
| + | |
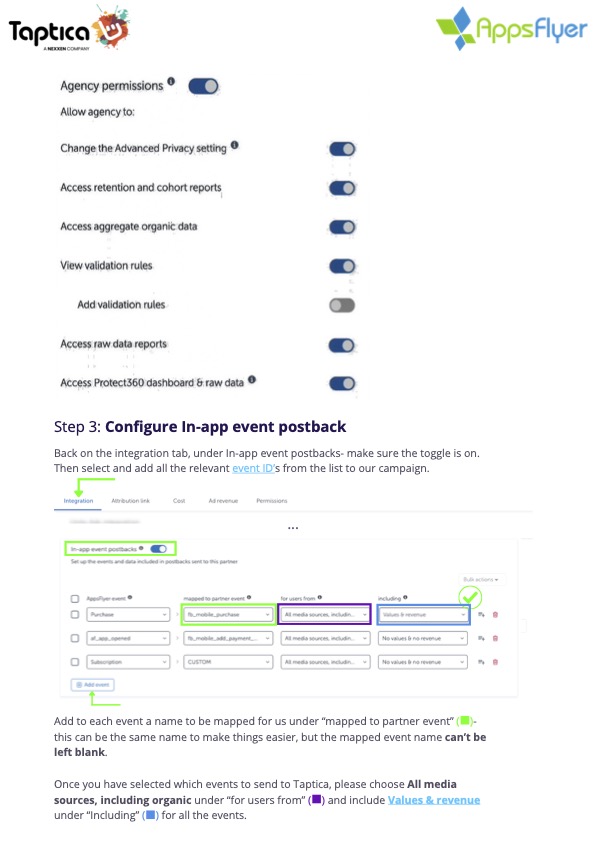
| − | Navigate back to the '''Integration''' tab and locate the '''In-app event postbacks''' section. Ensure the master toggle is switched '''ON'''.
| + | |
| − | <br><br>
| + | |
| − | Click '''Add event''' to select and map the relevant event IDs for the campaign, using the following rules:
| + | |
| − | <ul style="margin-top: 10px; padding-left: 20px; list-style-type: circle;">
| + | |
| − | <li style="margin-bottom: 8px;">Add a specific name under '''mapped to partner event''' for each event (cannot be left blank; using the identical name is recommended for simplicity).</li>
| + | |
| − | <li style="margin-bottom: 8px;">Under '''for users from''', select '''All media sources, including organic'''.</li>
| + | |
| − | <li style="margin-bottom: 8px;">Under '''including''', select '''Values & revenue''' for all events.</li>
| + | |
| − | </ul>
| + | |
| | </div> | | </div> |
| | | | |
| − | <!-- STEP 4 --> | + | <!-- PAGE 5 --> |
| − | <div style="margin-bottom: 25px; background: #fafafa; padding: 20px; border: 1px solid #eee; border-radius: 4px;"> | + | <div style="text-align: center; margin-bottom: 25px;"> |
| − | <span style="font-size: 18px; font-weight: bold; color: #E94E24;">Step 4: App Settings Configuration</span>
| + | [[File:AFtap5.jpg|1050px|center|link=]] |
| − | <br><br>
| + | |
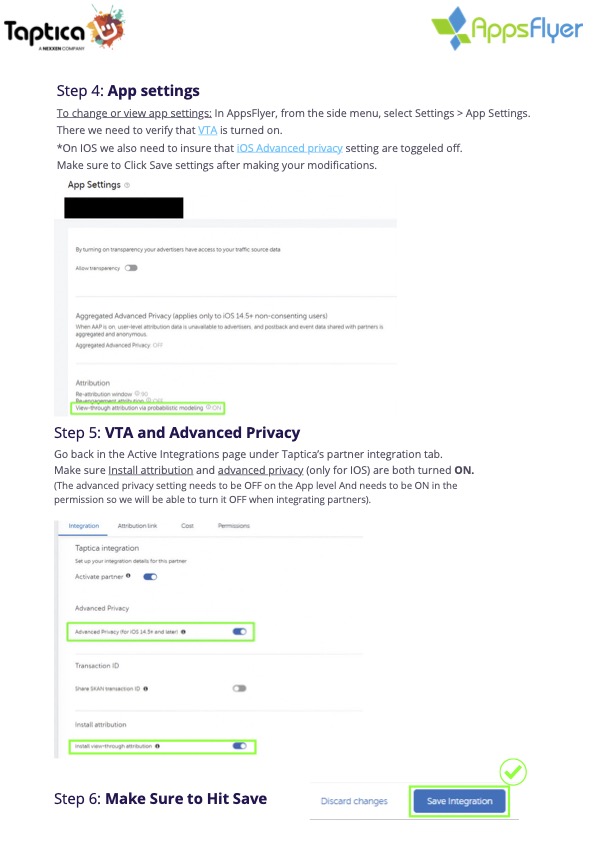
| − | From the AppsFlyer main side menu, go to '''Settings''' > '''App Settings'''.
| + | |
| − | <br><br>
| + | |
| − | Verify that '''View-through attribution via probabilistic modeling (VTA)''' is turned '''ON'''.
| + | |
| − | <br>
| + | |
| − | ''*Important note for iOS: Ensure that iOS Aggregated Advanced Privacy is toggled '''OFF''' at this app level (it will instead be safely managed via the partner permissions setup).''
| + | |
| − | <br><br>
| + | |
| − | Make sure to click '''Save settings''' after making any modifications.
| + | |
| | </div> | | </div> |
| | | | |
| − | <!-- STEP 5 --> | + | <!-- PAGE 6 --> |
| − | <div style="margin-bottom: 25px; background: #fafafa; padding: 20px; border: 1px solid #eee; border-radius: 4px;"> | + | <div style="text-align: center; margin-bottom: 25px;"> |
| − | <span style="font-size: 18px; font-weight: bold; color: #E94E24;">Step 5: VTA and Advanced Privacy Final Validation</span>
| + | [[File:AFtap6.jpg|1050px|center|link=]] |
| − | <br><br>
| + | |
| − | Go back to the Active Integrations area under Taptica's partner integration panel.
| + | |
| − | <br><br>
| + | |
| − | Ensure that both '''Install attribution''' (install view-through attribution) and '''Advanced Privacy''' (for iOS 14.5 and later) are toggled '''ON'''.
| + | |
| | </div> | | </div> |
| | | | |
| − | <!-- STEP 6 --> | + | <!-- PAGE 7 --> |
| − | <div style="margin-bottom: 25px; background: #E94E24; padding: 20px; border: 1px solid #E94E24; border-radius: 4px; color: #fff;"> | + | <div style="text-align: center; margin-bottom: 25px;"> |
| − | <span style="font-size: 18px; font-weight: bold;">Step 6: Save Integration</span>
| + | [[File:AFtap7.jpg|1050px|center|link=]] |
| − | <br><br>
| + | |
| − | Do not forget to scroll down to the bottom of the page and click the '''Save Integration''' button to complete the setup and make it live.
| + | |
| | </div> | | </div> |
| | | | |
| | <br> | | <br> |
| | + | <hr style="border: 0; border-top: 1px solid #eee;"> |
| | + | <br> |
| | + | |
| | 📍 [[MMP integration guide | 🔙 Back to MMP Integration Guides]] | | 📍 [[MMP integration guide | 🔙 Back to MMP Integration Guides]] |
| | | | |